Setting up KaseyaOne SSO v2 login with BMS
Introduction
KaseyaOne Unified Login enables you to log into all your subscribed modules (applications) using a single account with KaseyaOne. With KaseyaOne, you can switch apps without logging into each application every time. Enabling KaseyaOne allows your users to log into BMS using one KaseyaOne account.
This feature enables admins to standardize the login experience across all instances by enforcing KaseyaOne authentication for all user accounts. For added flexibility, admins can customize access by adding users and role groups to an exception list, ensuring uninterrupted access for technicians while aligning with your business needs.
The Employee page also has an option under MFA Settings to either exempt the user from or include the user for KaseyaOne Unified Login.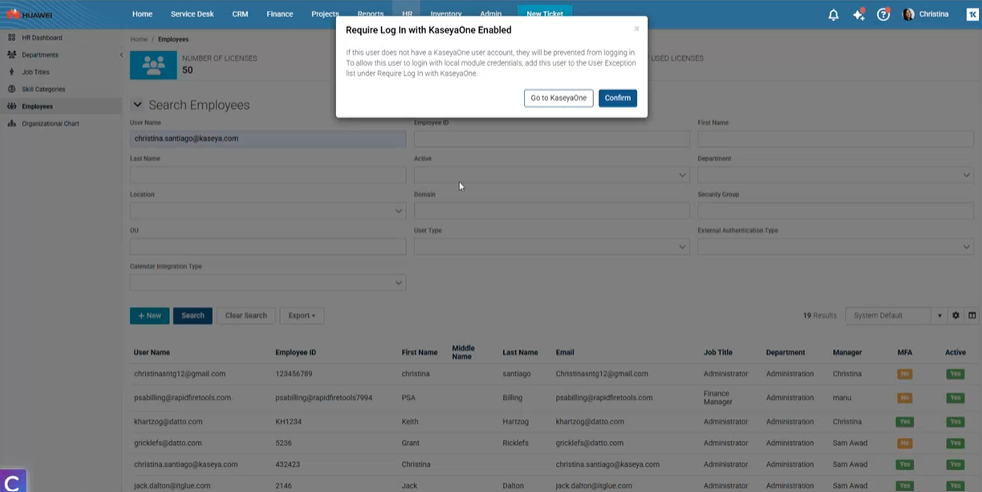
Also, if KaseyaOne Unified Login is set as required, users will not receive a welcome email immediately. The welcome email will be sent after the user has been successfully enrolled in KaseyaOne. You will see a popup to this effect when you are enabling SSO through KaseyaOne at > Admin > My Company > Auth & Provision > KaseyaOne Unified Login section.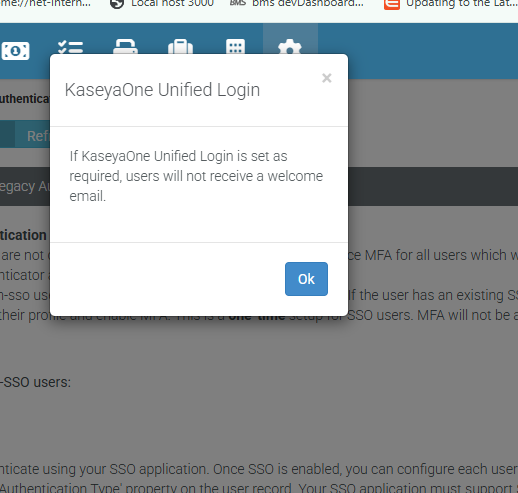
Prerequisites
- KaseyaOne account
- You should reach out to your Account Manager if you don't have a KaseyaOne account at this time.
- BMS admin account
- Passly app installed on your mobile
- Microsoft Authenticator, Google Authenticator, Duo, Twilio, Passly, FreeOTP, etc - Authenticators with 6-digit codes are also supported.
IMPORTANT The email in the KaseyaOne user account and BMS tenant account should match to leverage SSO v2.
Setup
- Navigate to Admin > Integrations > KaseyaOne.
- Move the slider to the right. This will make it Enabled. You will be redirected to a purple screen with a KaseyaOne logo.
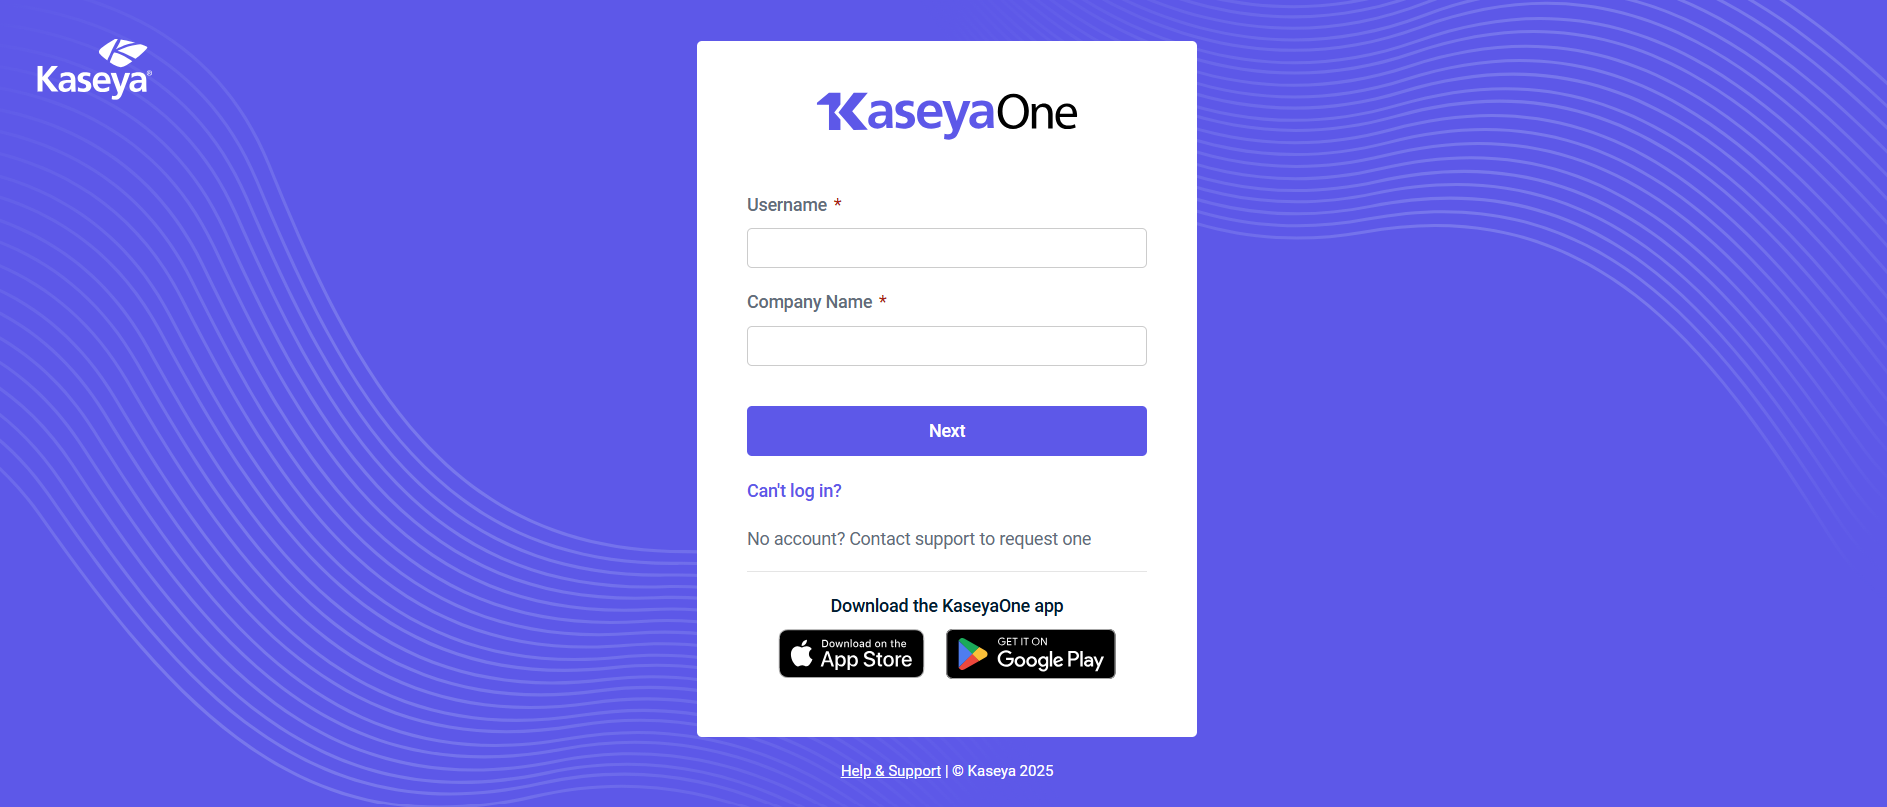
- Enter your KaseyaOne credentials and log into KaseyaOne. Once you log into KaseyaOne with your KaseyaOne credentials, access BMS and return to the same KaseyaOne integration page. You will see a success message in green on top of the page which says, Operation is completed successfully. You will also see new sections below the Enabled/Disabled option.
-
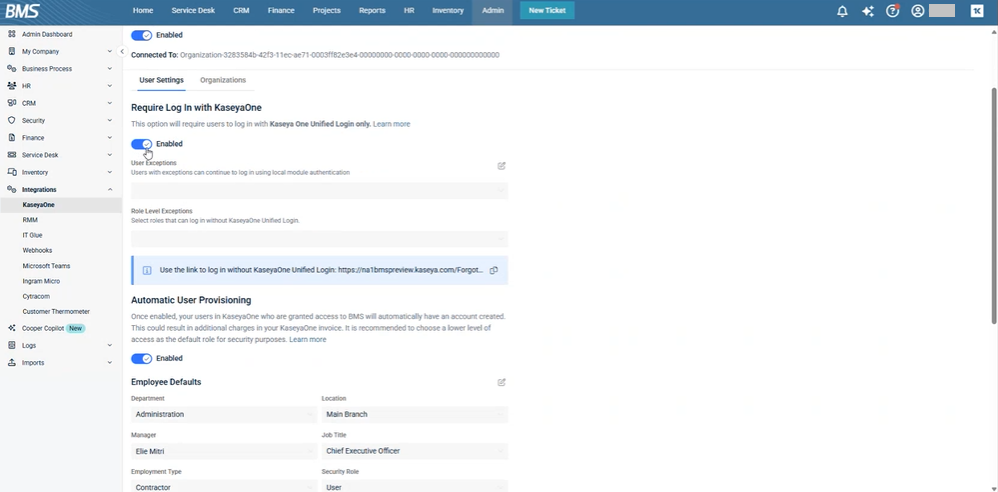
Under the User Settings tab, you will see Require Log in with KaseyaOne with an Enabled/Disabled option. Move the toggle to the right to enable the option. Now, all your users will be required to login with KaseyaOne Unified Login only except you. Since you are the admin user who enabled this feature, you are automatically exempted from the above option. You will not be able to delete yourself from being exempted. However, you can provide exceptions for other users at the user and role level. The moment you enable this option, you will see the two fields below - User Exceptions and Role Level Exceptions - getting activated.
-
You can search for a user from the dropdown, and you can click the tick mark at the right corner of the field above to save.
-
Repeat the above step in the case of Role Level Exceptions as well.
-
When you provide exceptions to these users or roles, they are exempted from logging in through KaseyaOne to access all available modules. They will be able to log in to their local modules using standard authentication (including MFA if enabled).
-
Automatic User Provisioning: Move the toggle to the right to enable this option.
-
Please read the note next to the option in the application before you go ahead with this option. For more information, see the introductory paragraph in Automatic User Provisioning.
-
Automatic User Deprovisioning: Move the toggle to the right to enable this option.
-
Please read the note next to the option in the application before you go ahead with this option. For more information, see the introductory paragraph in Automatic User Deprovisioning.
-
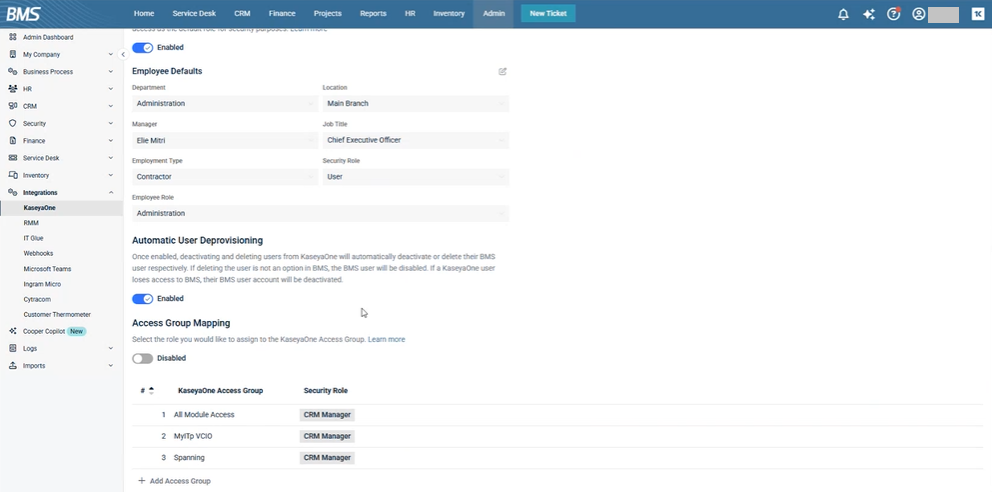
Access Group Mapping: Move the toggle to the right to enable this option. For more information, see Access Group Mapping.
-
To create a new access group mapping, click Add Access Group at the bottom, select the access group from the dropdown, and then select the security role from the dropdown on the right.
-
Click the tick mark at the end of the same row to save the access group mapping. You can edit it by clicking the pencil icon or delete it by clicking the bin icon at the end of the same row.
- Once this is done, if you log out from BMS, you can directly log in from KaseyaOne page link which is given at the bottom of the BMS login page. The settings that you have saved will then be effective for all users.
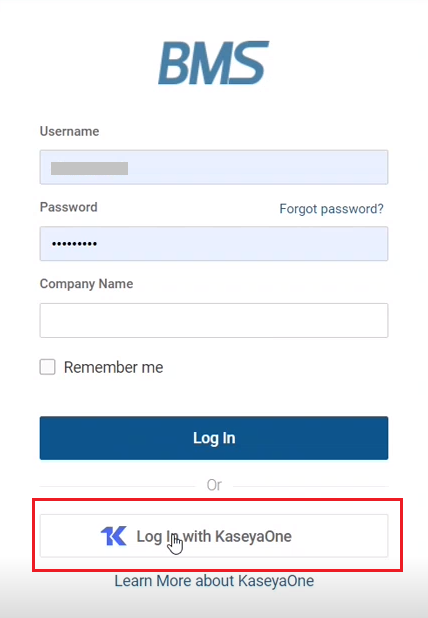
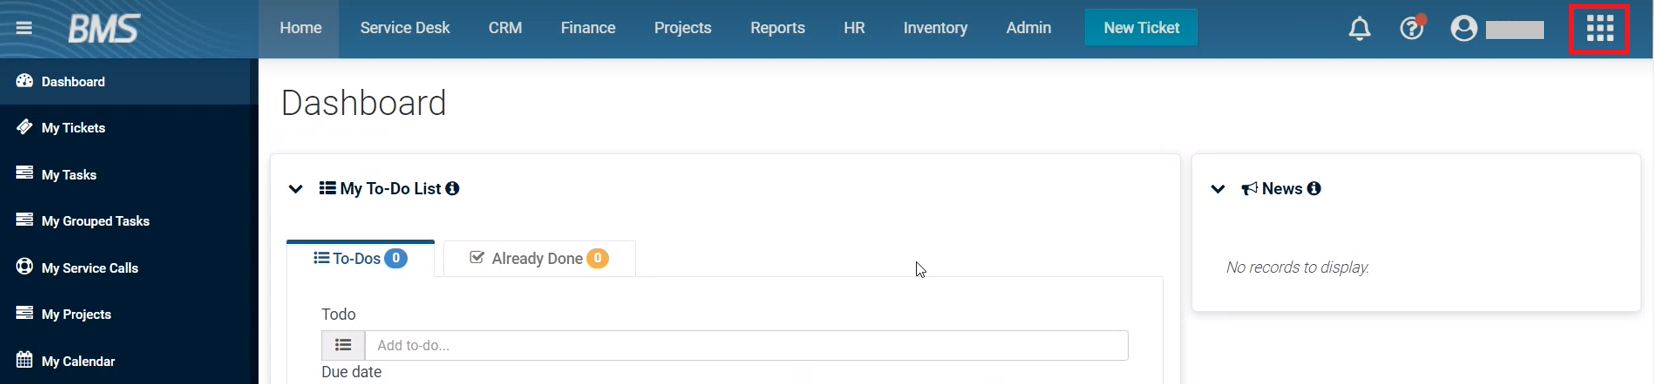
- Click Log in with KaseyaOne. Enter your KaseyaOne credentials (including the 6-digit code), and it will seamlessly log you into BMS. You will directly see the BMS Dashboard page once you log in. Once you are logged in with KaseyaOne, you will see a small snackbar icon on the top right of BMS application, next to your name. (See the image below.) This is the app launcher. You can click this icon and go to other KaseyaOne modules.
Disabling the SSO
- To disable the SSO login with KaseyaOne, go to the same path that is mentioned above.
- Move the slider to the left. You will see the K1 page briefly, and you will then be taken to BMS again. The K1 integration is now rendered inactive. You will see that the Log in with KaseyaOne link is disabled in the BMS login page.
Logging out of SSO and sessions
If you log in through the KaseyaOne gateway and then log out of BMS, then it logs you out of KaseyaOne too. So, the next time when you log in through the KaseyaOne gateway, it will ask you for your KaseyaOne credentials including the 6-digit authenticator code. If you log out from BMS after you have logged in from the KaseyaOne gateway page, you will be disconnecting the sessions from KaseyaOne as well as BMS.
Accessing BMS from K1 application: landing page
Alternatively, you can access BMS from KaseyaOne application. This is when you do not have an active KaseyaOne integration with BMS.
- Log into KaseyaOne from the KaseyaOne gateway page by entering your credentials and the 6-digit code. You will land inside KaseyaOne application. You will see two sections in the landing page - My Modules and Overview.
- Under My Modules, click BMS. It will display a list of tenants.
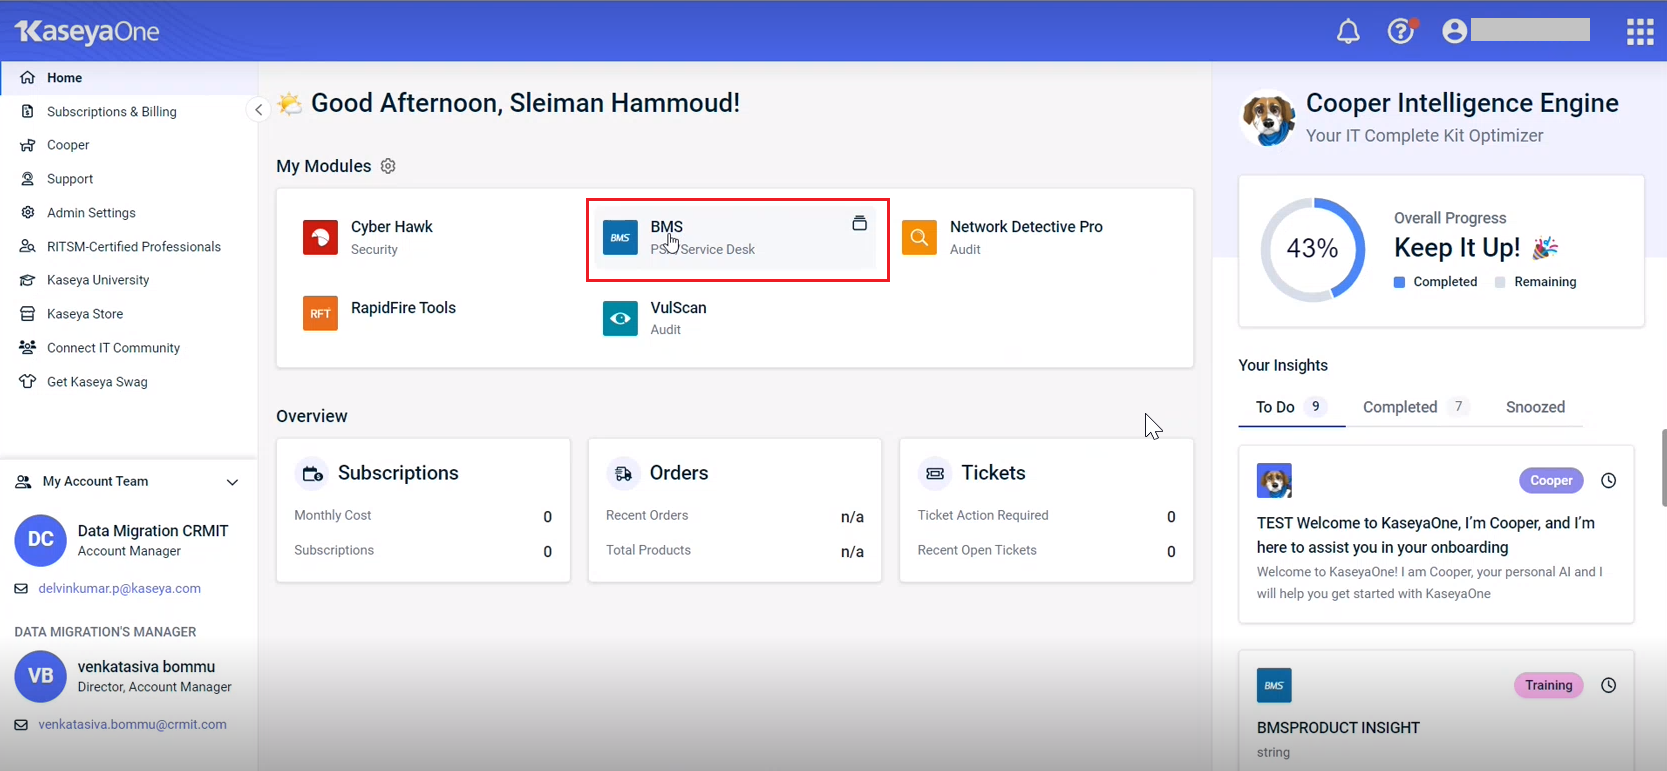
- Click to select the appropriate tenant (company).
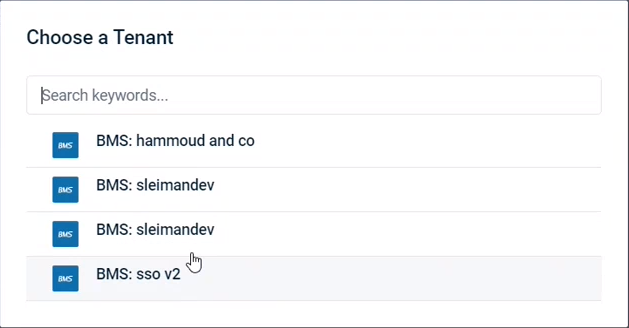
KaseyaOne will then seamlessly log you into BMS. You will then be taken to BMS Dashboard page.
Accessing BMS from K1 application: app launcher
Alternatively, you can still access BMS from KaseyaOne application but from a different place in the application. This is when you do not have an active KaseyaOne integration with BMS.
- Log into KaseyaOne from the KaseyaOne gateway page by entering your credentials and the 6-digit code. You will land inside KaseyaOne application. You will see the same landing page as mentioned above.
- Go to the app launcher icon (a snackbar icon situated at the top right corner of the application next to your name).
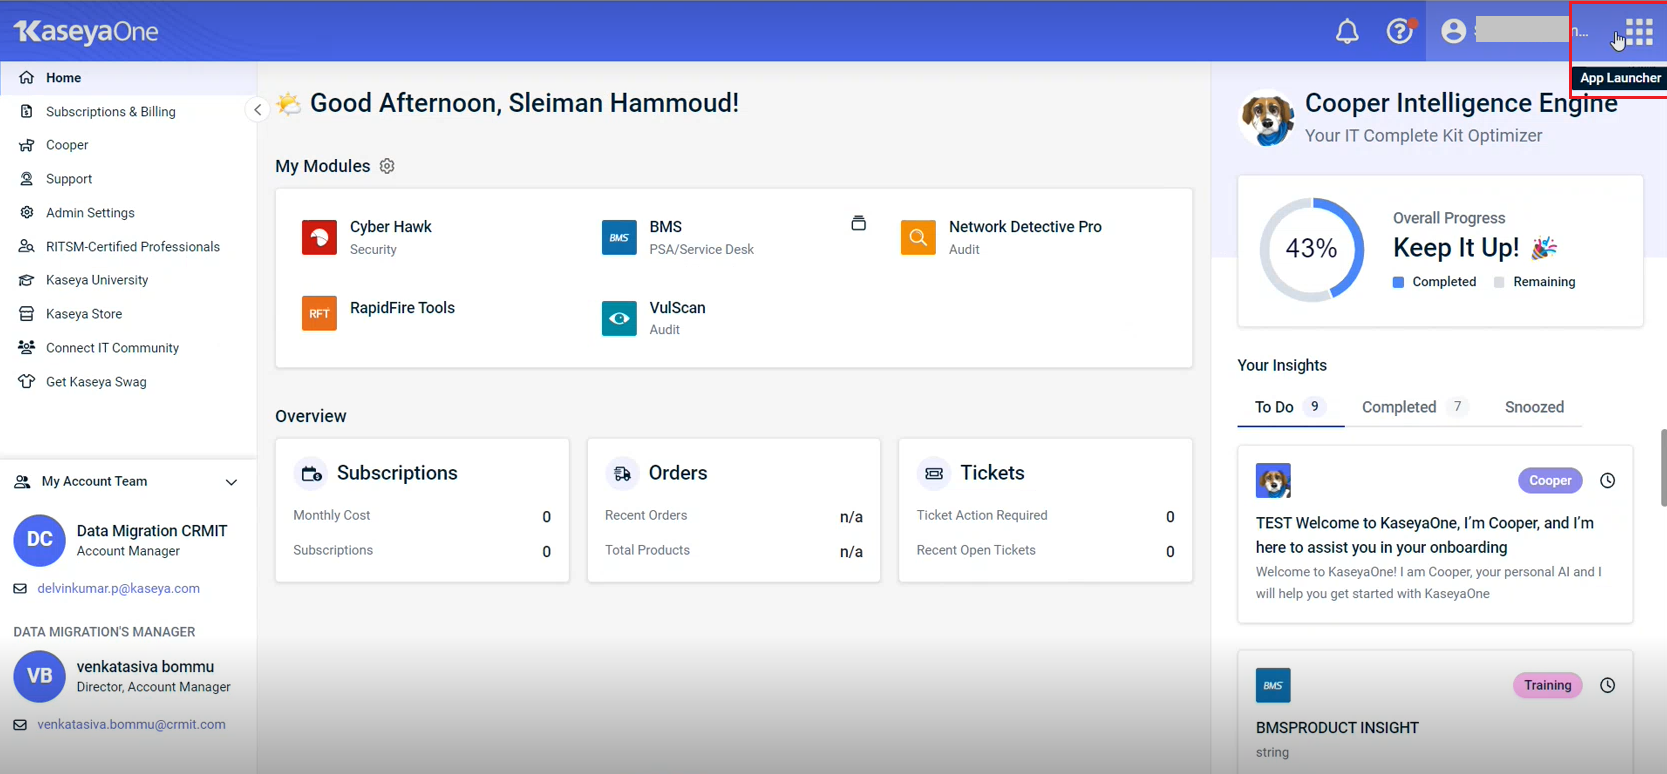
- Click this icon. You will see a list of tenants.
- Click the appropriate BMS tenant. You will be seamlessly taken to BMS Dashboard page.
- Select the appropriate tenant (company). KaseyaOne will then seamlessly log you into BMS. You will then be taken to BMS Dashboard page.
Setting up the landing page in BMS
You can set up a landing page of your choice from the KaseyaOne application.
- Once you are in the KaseyaOne application, go to Admin Settings on the left and then click Module URLs tab. So, for each application that is residing in KaseyaOne, you can actually enter the particular webpage URL.
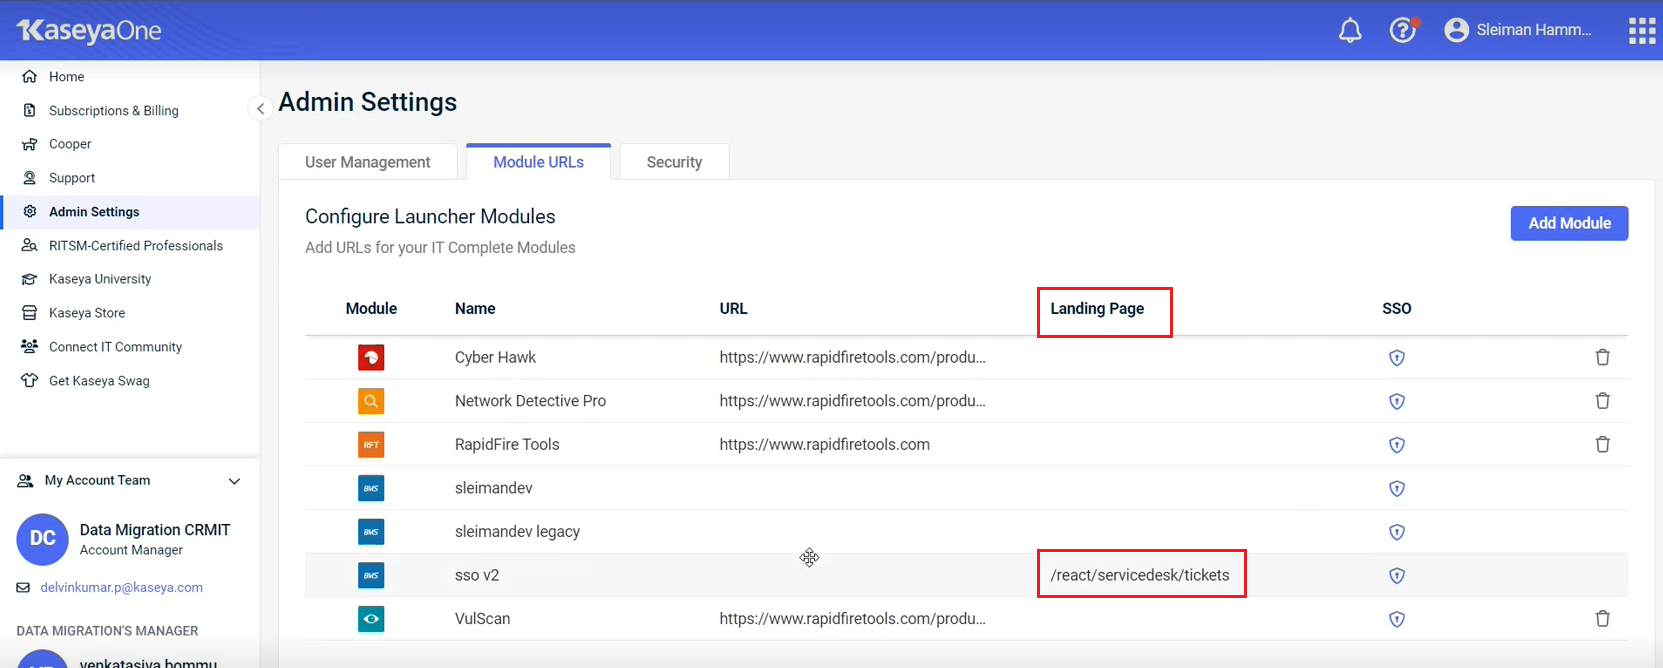
- Across the BMS module, enter the URL under the Landing Page column. For example, if you want to go directly to the Tickets page, you can enter https://<company name>.kaseya.com/react/servicedesk/tickets in the respective row under the Landing Page column. When you log into BMS through KaseyaOne next time, you will be taken to the specified URL page of BMS directly.


